This step-by-step guide outlines the process of installing a bathroom faucet, making it an accessible DIY project for homeowners looking to improve their bathroom’s functionality and appearance. It includes detailed instructions on gathering necessary tools, removing the old faucet, preparing the sink, and securing the new fixture in place. With clear directions and helpful tips, this guide ensures that even beginners can confidently tackle the installation and achieve a polished, professional-looking result.
Step-by-Step Guide: Replacing and Installing a Bathroom Sink Faucet
Gather Your Tools and Materials
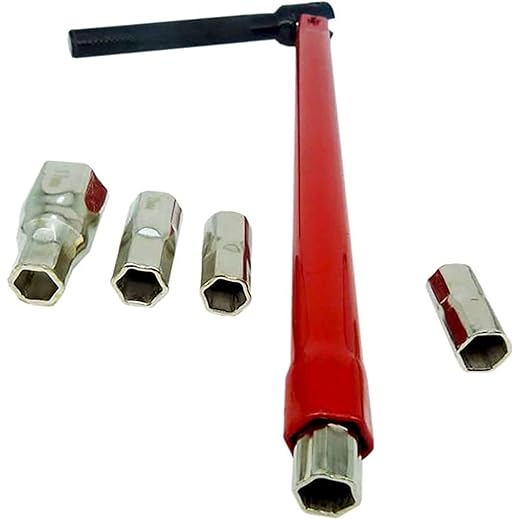
Gather all necessary tools and materials before starting your project. Collect an adjustable wrench and a basin wrench for loosening and tightening nuts in tight spaces. Ensure you have plumber’s tape on hand to create a watertight seal, and grab a bucket to catch any water that may spill during the process. Finally, pull out your new faucet kit, making sure it includes all components needed for installation.
Turn Off the Water Supply
Locate the water shut-off valves under your sink. These valves are typically found on the water supply lines leading to the faucet. Turn the valves clockwise to shut them off completely. If you can’t find shut-off valves, head to your home’s main water supply valve, usually located in the basement or near the water meter, and turn it off by rotating it clockwise.
Remove the Old Faucet
Locate the water supply lines beneath your sink, and use an adjustable wrench to disconnect them from the old faucet. Turn the wrench counterclockwise until the connections are loose, and then carefully remove the lines. Once the water supply lines are disconnected, identify the mounting nuts securing the faucet to the sink. Use the wrench to unscrew these nuts, turning them counterclockwise until they are fully loosened, and then gently lift the old faucet out of its position.
Clean the Sink Surface
Scrub the sink surface with a non-abrasive cleaner and a soft cloth to eliminate any soap scum, grease, or leftover residue from the previous faucet. Make sure to pay special attention to the areas around where the old faucet was mounted, as these spots can harbor grime that might interfere with the installation of your new faucet. Rinse the surface thoroughly with warm water to wash away any cleaner, and dry it with a clean rag to ensure a smooth, clean surface for your new faucet. Inspect the sink for any scratches or damage; if any are found, touch them up before proceeding with the installation to ensure a perfect fit.
Install the New Faucet
Position the new faucet into the mounting holes in your sink. Make sure it is centered and aligned correctly before you proceed. Take the provided mounting nuts and thread them onto the faucet’s tailpieces from underneath the sink. Tighten the nuts by hand first, and then use a wrench to secure them firmly, ensuring there’s no wobble in the faucet.
Connect the Water Supply Lines
Attach the water supply lines to the new faucet by threading each line into the appropriate inlet. Wrap plumber’s tape around the threads before each connection to create a tight seal and prevent any leaks. Secure the connections by tightening them gently with an adjustable wrench; avoid over-tightening to prevent damage. Check for any leaks by turning on the water supply and observing the connections closely.
Install the Drain Assembly
Ensure your work area is clean and gather all necessary tools. Insert the drain assembly into the sink’s opening, making sure it fits snugly. Position the rubber gasket around the drain hole to create a watertight seal. Secure the drain by threading the locknut onto the bottom of the drain, tightening it firmly by hand or with a wrench, ensuring not to overtighten. Check for alignment and adjust as necessary before moving on to the next step.
Turn On the Water Supply
Turn the water supply back on by locating the main shut-off valve and slowly twisting it counterclockwise. Observe closely for any leaks around the faucet and the water supply connections. If you detect any drips or moisture, immediately turn off the water supply again and tighten the connections as needed. Once tightened, turn the water supply back on and check for leaks once more to ensure everything is secure.
Test the Faucet
- Run the faucet for a full minute to flush out any debris. This helps ensure any sediment or particles stuck in the lines are cleared out, giving you cleaner water. For example, if you’re noticing cloudy water when you first turn on the tap, this step can really help.
- Check the water flow during this time. Observe how quickly the water comes out; a steady stream is a good sign. If you notice a weak flow, it could indicate a blockage.
- Ensure that both hot and cold water are functioning properly. Turn the handle to hot and then to cold, and feel the temperature difference. If hot water takes too long to arrive or it’s not warm enough, it may indicate issues with your water heater or plumbing.
Final Checks and Cleanup
Inspect all connections for leaks one last time. Turn on the water supply gradually and check under the sink for any signs of dripping or moisture around your new faucet connections. If everything looks good, proceed to clean up the area. Wipe down the countertop and surrounding space to remove any debris or residue from the installation. Dispose of the old faucet responsibly, recycling parts if possible, and discard any packaging from the new faucet to keep your space tidy.
Final Thoughts and Tips
In conclusion, you’ve not only tackled the task of installing your bathroom faucet but also set the stage for long-lasting enjoyment and functionality. Remember to perform regular maintenance to keep everything running smoothly, and take pride in your handy work. With your new faucet in place, your bathroom upgrade is complete, making it a stylish and practical space for years to come!
Essential Supplies Needed
Expert Installation Insights
Step-by-Step Guide to Installing Your Bathroom Faucet
- Gather Your Tools and Materials: Before you start, make sure you have all the necessary tools (like a wrench, screwdriver, basin wrench) and materials (the new faucet, plumber’s tape, and a towel) ready
- Turn Off the Water Supply: Locate the water supply valves under your sink and turn them off to prevent any unexpected leaks while you work
- Remove the Old Faucet: Disconnect the supply lines from the old faucet and remove any mounting hardware. Keep a towel handy to catch any water that may spill out
- Install the New Faucet: Follow the manufacturer’s instructions for your new faucet. Generally, you’ll need to position the faucet into the sink hole and secure it with the provided mounting hardware. Don’t forget to use plumber’s tape on the threads of the supply lines for a better seal
- Reconnect Water Supply and Test: Reattach the supply lines to the new faucet, turn the water supply back on, and check for any leaks. If everything looks good, you’re all set!
- Feel free to reach out if you have any questions along the way!
Subheading: “Step-by-Step Guide to Installing Your Bathroom Faucet
When you’re installing a faucet, avoiding common mistakes can save you time, money, and headaches. Here are some key points to keep in mind:
- Not Turning Off the Water Supply: This might seem obvious, but it’s easy to forget. Always turn off the water supply before starting any plumbing work to prevent leaks and water damage.
- Neglecting to Read the Instructions: Each faucet comes with its own set of installation instructions. Skipping this step can lead to mistakes. Make sure you familiarize yourself with the guidelines specific to your model.
- Over-tightening Connections: While you want to ensure everything is snug, over-tightening can crack fittings or cause leaks. Use a gentle hand and tighten just enough to create a seal.
- Failing to Use Plumber’s Putty: If your faucet requires it, don’t skip using plumber’s putty or silicone sealant. This creates a watertight seal and helps prevent leaks at the installation site.
- Ignoring the Importance of Leveling: Ensure your faucet is level before securing it in place. An uneven faucet can create water flow issues and may look unappealing.
- Not Checking for Leaks After Installation: Once you’ve installed the faucet, always turn the water supply back on slowly and check for leaks. This allows you to fix any issues before the area gets wet or damaged.
- Forgetting to Clean the Area: Before installing the new faucet, clean the sink surface thoroughly to ensure a good seal. Residue or debris can compromise the installation.
- Using Incorrect Tools: Make sure you have the right tools for the job. Using improper tools can damage parts or make installation more difficult.
- Not Double-Checking Compatibility: Ensure the new faucet fits with your existing plumbing setup. This includes checking for the right number of holes in your sink and matching sizes.
By being mindful of these common pitfalls, you’ll set yourself up for a successful faucet installation that not only looks great but functions perfectly! Happy plumbing!
>> Learn more: 8 Amazing Bathroom Designs You Have to See!


One tip I’d throw in is to always turn off the water supply first—trust me, learned that the hard way! 😂
Just wanted to add that using plumber’s tape on the threads can really help prevent leaks. 👍
Is there a specific faucet brand you recommend? I’m kind of lost on what to choose.
Great tips! I was so intimidated about changing my faucet, but this made it seem easy. Thanks!
Can you make a video tutorial next time? I’m more of a visual learner!
Awesome article! I finally tackled my bathroom upgrade, and it’s looking fab!
I had no idea I needed a basin wrench. That would have saved me a lot of frustration!